The 35-Watt Roommate (Part 7): Goodbye Fritz!Box, Hello Ubiquiti
- 1.The 35-Watt Roommate (Part 1): From Memory Hunger to Mini Powerhouse
- 2.The 35-Watt Roommate (Part 2): The Cloud in a Cabinet
- 3.The 35-Watt Roommate (Part 3): Middle-earth and the Digital Infarction
- 4.The 35-Watt Roommate (Part 4): Docker Cleanup and Surgical Data Recovery
- 5.The 35-Watt Roommate (Part 5): Monitoring, or 'Why is the internet constantly asking for my .php files?'
- 6.The 35-Watt Roommate (Part 6): Ads? Never Heard of Them.
- 7.The 35-Watt Roommate (Part 7): Goodbye Fritz!Box, Hello Ubiquiti
- 8.The 35-Watt Roommate (Part 8): Umami Analytics, or How a Password with Special Characters Broke Everything
Why switch at all?
The Fritz!Box 7690 is a capable device. Telephony, Wi-Fi, DECT, smart home, all in one box. That is also the problem. I want a network I actually control: VLANs, firewall rules, a proper dashboard. The Fritz!Box does a bit of everything; I want something that does the routing well and leaves the rest to me.
On top of that, I kept running into performance problems over the past few months. The Wi-Fi would slow down for no obvious reason, in the middle of the day, with the same number of devices as always. Streaming stuttered, video calls lagged. A reboot fixed it every time, but who wants to restart their router on a schedule? It felt more and more like the box was overwhelmed by everything it had to handle: smart home devices, DECT phones, VPN, guest network, AdGuard as DNS. At some point it just could not keep up.
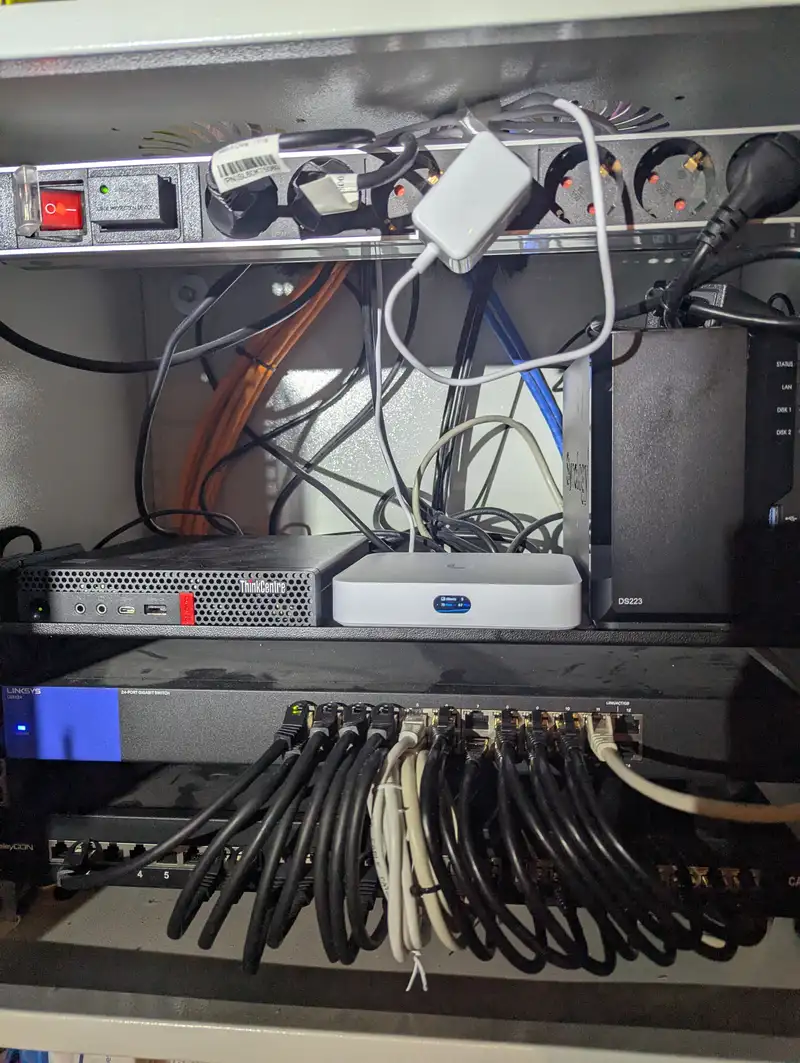
I went with the Ubiquiti Cloud Gateway Ultra (UCG Ultra). Small, reasonably priced, and the UniFi ecosystem has everything a homelab network needs.
Step 1: reading the Fritz!Box config
Before unplugging the old router, you should know what it actually does. The Fritz!Box has an export function under System → Backup → Save. The result is an .export file, basically a massive text dump of every configuration file on the device.
The relevant WAN settings live inside ar7.cfg. Opening that file for the first time feels a bit like doing your taxes. Thousands of lines, cryptic variable names. But the handful of values you actually need are easy to spot once you know what to look for.
One thing to keep in mind: the export file is encrypted if you set a password during export. Passwords and credentials inside the config are additionally encoded. If you need to extract plaintext credentials from the file (e.g. SIP credentials for VoIP), you can use my Fritz!Box Config Decrypt Tool.
Step 2: understanding the WAN settings
My ISP is Buchholz Digital (BuDi) with an FTTH connection. The setup is refreshingly simple: no PPPoE, no credentials. The router connects via Ethernet to the ONT, tags VLAN 700, and gets a public IP through DHCP.
Here is the relevant section from the Fritz!Box config:
dslifaces {
        enabled = yes;
        name = "internet";
        dsl_encap = dslencap_ether;
        dslinterfacename = "dsl";
        no_masquerading = no;
        stackmode = stackmode_ipv4only;
        vlancfg {
                vlanencap = vlanencap_fixed_prio;
                tagtype = vlantagtype_customer;
                vlanid = 700;
                vlanprio = 0;
        }
        ppptarget = "internet";
        mtu = 0;
        etherencapcfg {
                use_dhcp = yes;
        }
        stay_always_online = yes;
}
The key values at a glance:
| Setting | Value |
|---|---|
| Connection type | DHCP (no PPPoE) |
| Internet VLAN | 700 |
| VoIP VLAN | 650 |
| TR-069 VLAN | 550 |
| IPv4 | via DHCP |
| IPv6 | Automatic (dual-stack) |
| MTU | 1500 (auto) |
Three VLANs in total. For the UCG Ultra, only VLAN 700 matters. VLAN 650 handles telephony and VLAN 550 is for remote management by the ISP. The UCG Ultra needs neither.
Step 3: configuring the UCG Ultra
The UniFi Network Controller makes this surprisingly painless:
- Under Internet/WAN, set connection type to DHCPv4.
- Set VLAN ID to 700. This is the one that matters.
- MAC Address Override is there if the ISP expects the Fritz!Box MAC. I did not need it, but it is good to know it exists. You can find the old MAC in the export file under
user.cfg, where the Fritz!Box itself is listed as a device:
usercfg {
        users2 {
                type = internet_user_ip;
                landeviceUID = 8511;
                mac = 34:E1:A9:24:97:3D;
        }
}
The MAC is also on the sticker on the bottom of the Fritz!Box, or in the web interface under Home Network → Network.
4. Set IPv6 to “Auto” or “DHCPv6” for dual-stack.
5. Set DNS to custom servers (in my case 192.168.50.250 for AdGuard and 1.1.1.1 as fallback).
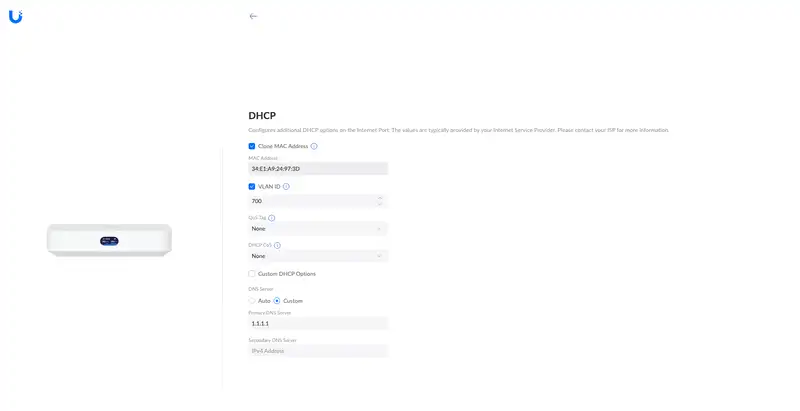
Cable from the ONT into the WAN port of the UCG Ultra, configure VLAN 700, done. It worked on the first try. I was almost disappointed there was no drama.
Step 4: migrating LAN settings
I carried the Fritz!Box settings over to the LAN side. The subnet is 192.168.50.0/24 with gateway 192.168.50.1 and a DHCP range from 192.168.50.20 to 192.168.50.200.
Static DHCP leases:
| Device | IP | MAC |
|---|---|---|
| NAS | 192.168.50.2 | 90:09:D0:35:57:8B |
| Proxmox | 192.168.50.24 | 98:FA:9B:2E:20:CB |
| Docker host | 192.168.50.46 | BC:24:11:A5:65:6F |
For the IPv6 ULA prefix I set fd15:d91c:273f::/48 manually on the UCG Ultra so that local IPv6 addresses (like AdGuard on fd15:d91c:273f::250) stay stable.
Does the ISP notice the switch?
Yes, and it does not matter.
The MAC address on the WAN port is different. With a DHCP connection like mine that is not a problem: the DHCP server just hands out a new lease. If it does cause trouble, the UCG Ultra lets you override the MAC. The DHCP hostname also changes, since the Fritz!Box sends fritz.box and the UCG Ultra sends something else. That is purely cosmetic.
TR-069 goes away. The Fritz!Box was remotely managed by the ISP via TR-069 on VLAN 550, and the UCG Ultra does not support it, so the ISP loses remote access to the router. In my case a quick phone call to BuDi sorted it out. Everything else stays the same: VLAN 700 works identically, DHCP-based IP assignment is device-independent, and the fiber connection at the ONT is unchanged.
What about VoIP?
The Fritz!Box handled telephony over VLAN 650, and the UCG Ultra cannot do SIP. If you still need a landline, you can run the Fritz!Box as an IP client behind the UCG Ultra just for telephony, or use a standalone SIP phone or adapter.
I went with the first option. The Fritz!Box now sits on a LAN port of the UCG Ultra in IP client mode and only handles DECT and phone calls. To set that up, go to Internet → Account Information → Internet Access in the Fritz!Box UI and switch to “Use existing internet connection (IP client)”. Retirement for the Fritz!Box, but with a small side gig.
What I learned
Everything starts with the Fritz!Box export file. All WAN settings live in ar7.cfg, and once you have fought through the text dump you can find the relevant values in a few minutes. For FTTH with BuDi you only need three things: VLAN 700, DHCP, no PPPoE.
Swapping the router on a DHCP connection is painless. No activation, no waiting: plug it in, configure the VLAN, it works. The only call to the ISP was about TR-069. TR-069 going away feels more like a feature than a bug, and the Fritz!Box lives on as a dedicated telephony device in IP client mode instead of going in the bin.
The 35-watt roommate now has a new neighbor in the network cabinet. Part 8 is about the UniFi VLAN setup, because once you have a proper router you might as well do proper network segmentation.